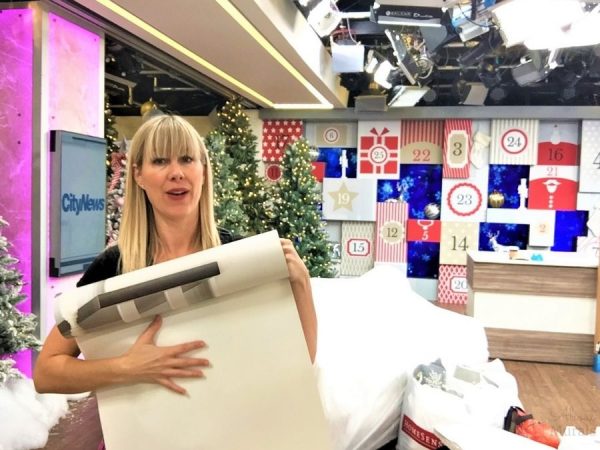
Watch this video to learn how to hang prepasted wallpaper from professional wallpaper installer, Adrienne. It teaches you the best way to install wallpaper quickly. Your friends will think you hired a pro – even if you’re a beginner!
Find more resources with our written wallpaper instructions, learn more about our installation services or read the FAQ Wallpaper Section.
How To Hang Prepasted Wallpaper Video
Watch the step-by-step video above and learn how to hang prepasted wallpaper from our shop.
For more DIY Wallpaper Tutorials, remember to Subscribe to our YouTube Channel!
How to Hang Prepasted Wallpaper
Watch the YouTube video above and then follow our step-by-step How to Hang Prepasted Wallpaper instructions below for an easy DIY project.
1. Prepasted Wallpaper Tools
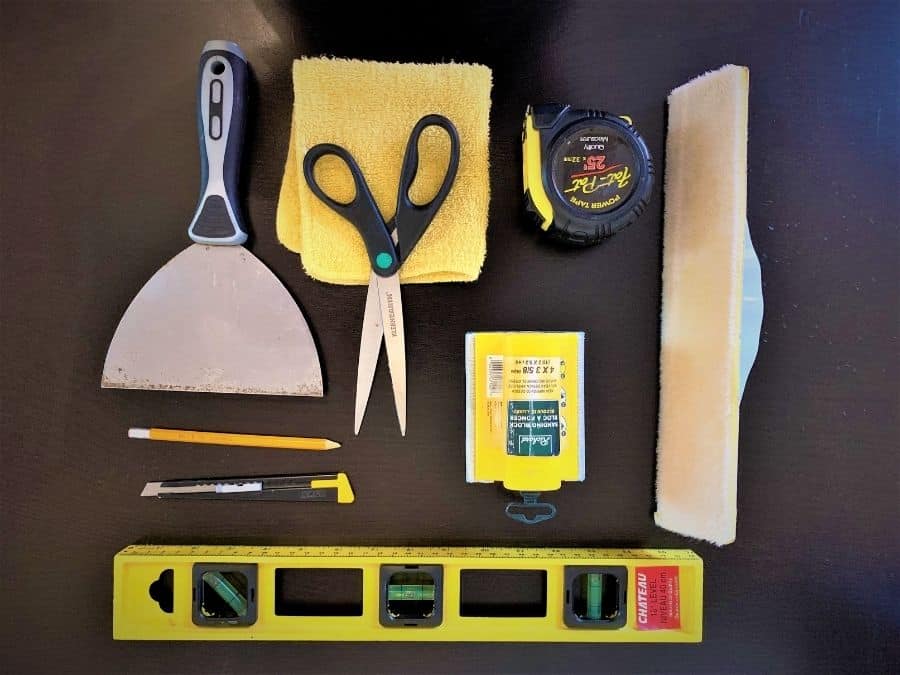
Here is a list of wallpaper tools you need to install your prepasted wall mural. Shop for these wallpaper tools from Amazon!
- Level
- Tape measure
- Sponge smoother or sponge (not a plastic smoother)
- Exacto knife
- Pencil
- Large putty knife
- Scissors
- Clean cloth
- Fine sandpaper
- Bin for water
- Ladder
2. Prepping Walls for Wallpaper

Paint or Priming Walls Before Wallpapering
- You can hang this wallpaper over any latex paint that has cured (dried) for at 21 days.
- Do not hang this wallpaper over regular latex primer. It will be difficult to “slide” around on the wall and the primer may chip off under the wallpaper.
- If your wallpaper is white or light coloured, dark coloured paint may show through the wallpaper.
If you need to paint before you apply wallpaper, please follow this guide:
- Latex paint in an eggshell, pearl or semi-gloss finish – paint and wait 21 days to hang your wallpaper.
- Acrylic paint – paint and wait 21 days to hang your wallpaper.
- Oil or alkyd based primer (avoid odorless) – paint and wait 3 days to hang your wallpaper.
- Zinsser BIN Lacquer Sealer – paint and wait 1 hour to hang your wallpaper.
- Roman 997 primer is suitable for new build construction projects. Paint over latex primer and wait 1 day to hang your wallpaper.
- Roman 999 primer is suitable to use over glass, mirror or melamine.

Sand and Clean the Wall for Your Water Activated Wallpaper
- Sand down any bumps with a fine sandpaper, to create a smooth wall.
- Wipe the wall, ceiling and baseboards with a damp cloth to remove dust, debris and cobwebs.

Surfaces Suitable for Preglued Wallpaper
Hang these wallpaper murals on any smooth wall with the appropriate painted finish, as mentioned above.
Our prepasted wall murals are also suitable to install over:
- Mirror or glass – clean well; no print or primer required
- Melamine – paint two coats of oil based primer, Zinsser BIN Lacquer Sealer or Roman 999 primer.
- Ceramic – paint two coats of oil based primer or Zinsser BIN Lacquer Sealer
3. Install Prepasted Wallpaper
Wallpaper Seams
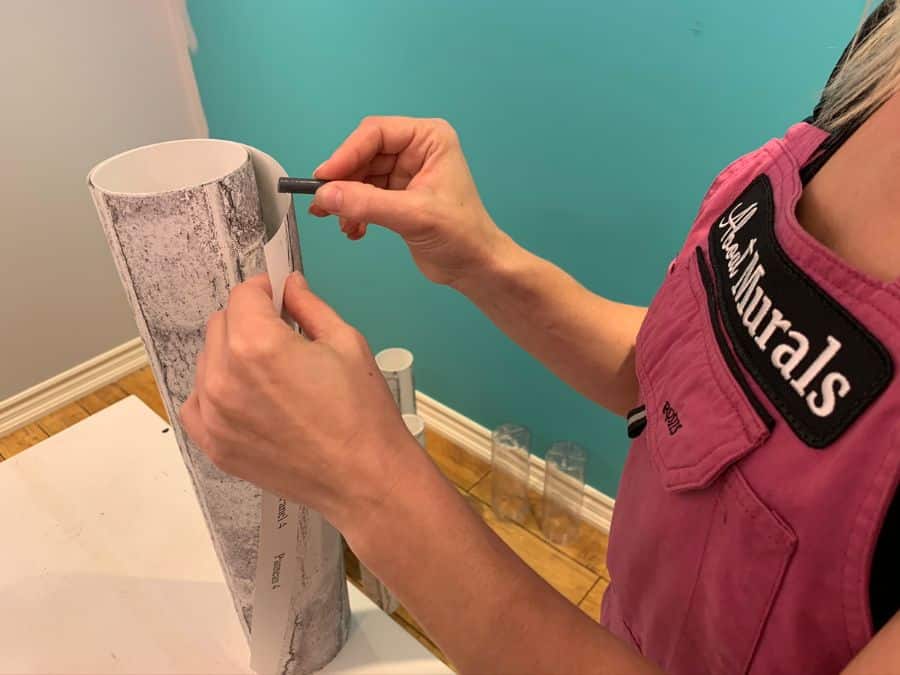
- Hang panels from left to right OR right to left. Choose your starting point by imagining your exposed overlapping seam facing away from you when you walk into the room.
- Use the included crayon to colour the white edge of the panel that will be exposed. This will hide wallpaper seams.
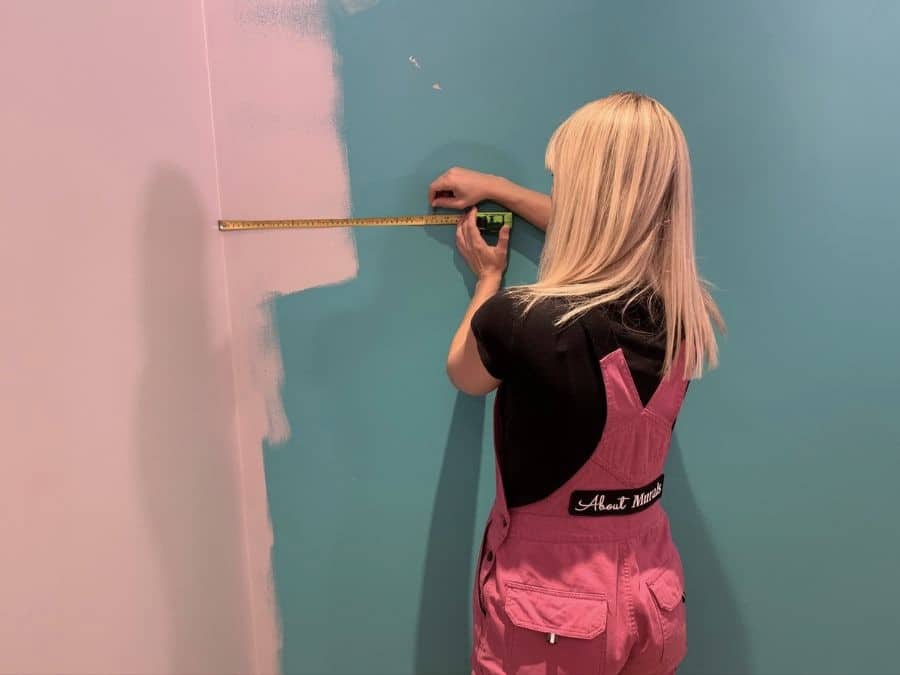
Level Line
- Make a light pencil mark 17″ from the left OR right corner.
- Draw a vertical line with your level at the 17″ mark, lightly in pencil. Panels are 18″ wide, so trim the excess off in the corner to allow for unlevel walls.
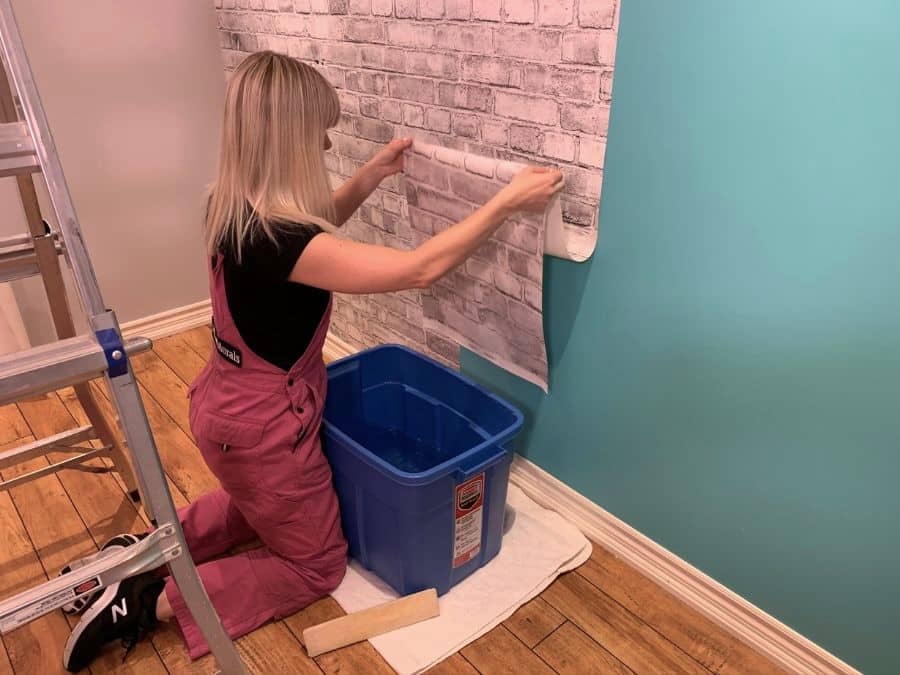
Soak and Hang Wallpaper
- Fill a bin with lukewarm water and place it against the wall.
- Roll your first wallpaper panel, starting at the bottom with the pattern facing in (blank side facing out). The top of the wallpaper should be the last part rolled up.
- Dunk the rolled up wallpaper into water for 15 seconds to soak it. Water activates the paste and does not harm the paper.
- Slowly pull the top of the panel out of the bin, climbing the ladder as you go.
- Place the first panel on the wall and slide it against the level line. You can slide the panel on the wall for up to 2 minutes making it easy to line up.

Cut Wallpaper
- Make sure there is at least 1-2″ of excess wallpaper pattern to trim at the ceiling and baseboard.
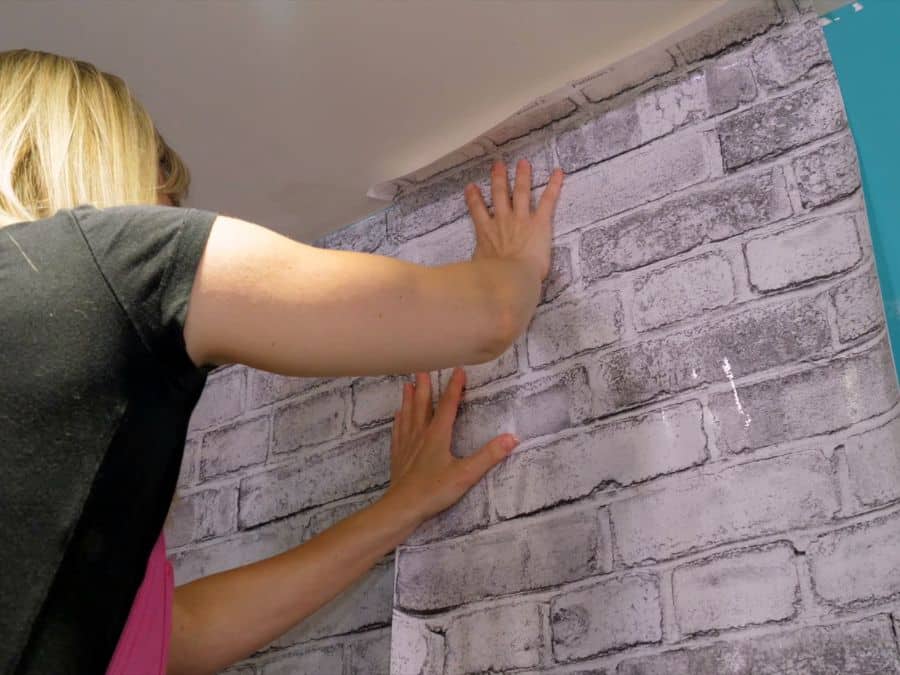
- Gently smooth air bubbles with your sponge smoother. Be careful to not press paste out. Any small air bubbles left disappear in 24 hours.
- Trim the excess 1″ vertically in the corner once the panel is on the wall, using your putty knife and the exacto knife. A corner is never perfectly level, and this allows a 1″ buffer.
- Trim the excess 1-2″ off horizontally at the ceiling and baseboard once the panel is on the wall, using your putty knife and the exacto knife. A wall is never perfectly level and this allows a 1-2″ buffer. Do not pre-trim the wallpaper before hanging on the wall.
- Gently wipe the seam, baseboard and ceiling with a damp cloth to remove residual paste.
Overlap Wallpaper
- Repeat this procedure and overlap wallpaper panels, in numerical order, by 1/4″.
- Prepasted wallpaper slides around on the wall for a couple minutes, so it’s easy for you to match the pattern up at the seams.
- Change your exacto blade often.
- Ensure each panel is straight with your level.
Congrats…you did it!
Share a photo for a chance to be featured!
Send us a photo of your prepasted mural for a chance to be featured on our blog and social! Simply message us, tag us on Facebook (/aboutmurals) or Instagram (@about_murals).
Expert Wallpaper Installation
If you need a wallpaper installer in Toronto, Hamilton, Niagara or other parts of Ontario, Canada, we offer installation services.
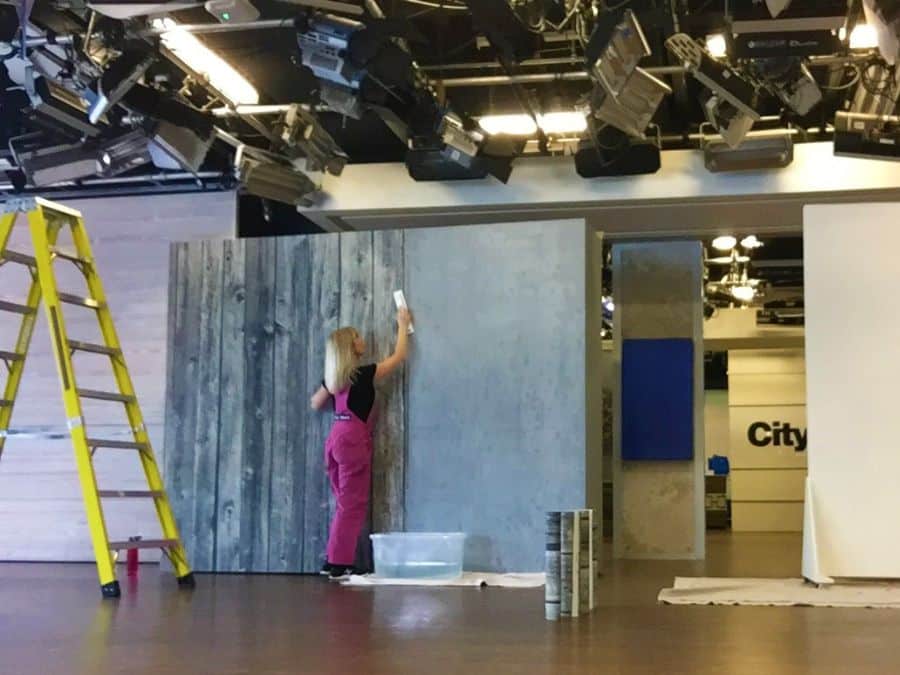
Owner and founder, Adrienne Scanlan, hangs our wallpaper murals for celebrity designers like Colin and Justin, Brian Gluckstein, Jackie Glass and Kimberley Seldon on set at Cityline. You know you’re working with an expert who cares about the small details and who stands behind her quality service.
If you live elsewhere, find a qualified installer at the Wallcovering Installers Association.
FAQ Wallpaper
Pre pasted wallpaper just means there is a layer of dry wallpaper paste on the back of the paper, that is activated with water. It eliminates the need to figure out the right type of paste to buy and you don’t need to apply it to the back of the paper or wall, so it’s less messy.
Yes, it’s easier to install than any other type – just follow our How To Hang Prepasted Wallpaper video tutorial. It slides around on the wall for a couple of minutes, allowing you to easily match the pattern up at the seams (unlike peel and stick). You don’t need to buy or apply paste to the wall or paper, because it’s already on the back of the wallpaper. Just add water to activate the paste!
Prepasted wallpaper is easy to remove if it is a non-woven paper, hung over the right type of paint or primer and the paint or primer has dried/cured for at least 21 days. With any type of wallpaper, if paint isn’t fully cured, it may fuse with the paste or adhesive, potentially damaging the wall when removing wallpaper.
Yes, you have to wet prepasted wallpaper. There is dry paste on the back of each panel and it is activated with water.
Dunk each prepasted wallpaper panel, rolled up with the paste side facing out, for 15-30 seconds in a bin of luke warm water. If you prefer to spray the back of your water activated wallpaper on a table using a bottle, soak it thoroughly and “book” it, allowing it to relax for 5 minutes.
Yes, each 18″ prepasted wallpaper panel expands by 1/8″ in width when wet. It does not expand in height.
Prepasted wallpaper already has dried paste on the back of the paper, which is activated with water. For most standard rooms, you don’t need extra glue. However, you may want to use extra paste for special projects like high traffic doors that get touched a lot or adding prepasted wallpaper to a ceiling, where gravity is a factor. For these custom projects, simply roll on a thin layer of wallpaper paste to the wall, ceiling or door, then apply prepasted wallpaper as per normal instructions.
Yes, prepasted wallpaper is easy for one person to install yourself. Narrow, 18″ wide panels and our video tutorial make the hanging process simple.
You need a bin or a spray bottle full of water, to activate the dry paste on the back of the wallpaper. We recommend using a sponge smoother to smooth out air bubbles, instead of a plastic smoother which can push paste out from under the paper. Like with all other wallpaper types, you also need a level, tape measure, exacto knife, pencil, straight edge or putty knife, scissors, a clean cloth, sandpaper and a ladder.
If you’re hanging wallpaper on a feature wall, you can start installing in the left OR right corner. If you’re wrapping the wallpaper around an entire room, start next to a door. With all wallpaper, the pattern never matches at the seam when hanging the last panel against the first. There is very little wall above a door, so the unmatched pattern is less noticeable.
Start hanging each wallpaper panel from the top of the wall, leaving 1-2″ on the ceiling to trim later. Moving down the wall, slide the panel to match the pattern up at seams. There should be another 1-2″ covering the baseboard at the bottom, to trim later. Make sure each panel is level, smooth out bubbles using a sponge smoother and trim the excess with an exacto knife.
Rather than purchasing a water tray, which is small and can cause spills, use a large bin that you already have around your home. Alternatively, use a spray bottle to wet the back of your pre pasted wall covering.
When applying prepasted wallpaper, you trim the excess off at the ceiling, baseboards, corners and around windows when it’s on the wall and still wet. Make sure to use a fresh blade on your exacto knife after hanging every two panels, since wet wallpaper is more prone to tearing.
During installation, smooth large air bubbles out with a sponge smoother. Any small bubbles disappear within 24-48 hours, as the wallpaper paste dries.
Yes, our prepasted bathroom wallpaper absorbs and then releases moisture and humidity. This makes it mold and mildew resistant, unlike vinyl wallpaper that can trap moisture under the paper and cause mold issues. However, it’s recommended the wallpaper doesn’t come into direct contact with water. A tile backsplash around a sink or shower is the perfect barrier to protect your wallpaper.
Yes, our water activated wallpaper is safe for a nursery. It is PVC and vinyl free, formaldehyde free and chlorine free with no lead or phthalates, so it won’t off-gas and affect your baby’s air quality. It is LEED certified for schools and meets indoor air quality standards for high performance schools and green guide for healthcare settings.
Prepasted wallpaper, like any wallpaper, only sticks to walls that are properly prepped. It will not adhere to fresh drywall, joint compound or DryDex that hasn’t been sanded, primed and painted. You also get the best results by wiping dust, food and grease stains from walls before hanging wallpaper.
More Wallpaper DIY Tips
Join our newsletter community to receive more wallpaper DIY tips like this “How to Hang Prepasted Wallpaper” guide, along with sale alerts for our wallpaper murals!